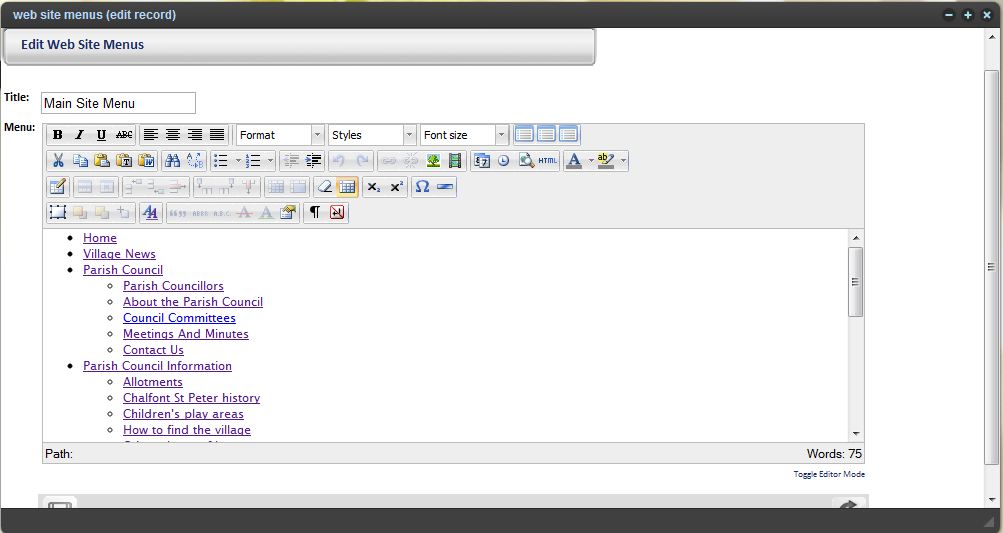
fig. 9.1 - an example text based menu opened in edit mode.
There are two ways that menus are created and edited - a simple text based method, and the more complex 'relational database' method.
If you have access to edit any menus, you will see the 'Edit Menus' button either off the main Admin Menu in the administrator, or on the database administrator home page.
Simple text based menus
This section requires that you are familiar with the Rich Text Editor, and know how to link your content to other pages. Please read back over the secction on links on the rich text editor page if you are not familiar with this.
In the text based method, the menu takes the form of any other page of content, and contains a list of menu items - one per line. These items are linked to their respective pages in the same way that you would create a link in any other page of content. This list may contain indented items if your menu is multi-tiered - that is rather than one straight forward list forming the menu, it contains parent and child items in a hierarchial structure. See figure 9.1 as an example of this.
In this example multi tiered menu, you can see that the first three items are main top level items, but the fourth and several subsequent items are indented. On the front end of the web site these indents may be translated into other functionality - for example indented sections may pop up as the mouse is moved over the parent item. However for the purposes of editing, the display is always as shown in figure 9.1 where the indentations correspond to the different levels, so you can see at a glance which items are children of others.
 Indent: Add a new item underneath the parent item and hit this to move it to the next level up. It will then appear in the menu as a sub-item of the item above.
 Outdent: Use this to move items back one position (ie up one level).
It is important not to indent too many levels at once - make sure you only go up or down in single indents or you will risk the possibility of creating an 'orphaned' menu item - ie one which has no parent and may therefore not display. You will know when your indenting is correct as the text will return to match the indent amount of the text above or below when indented our outdented once only.
If you are running a basic web site, menus will already be positioned on the site. If you need to add menus to new places, text based menus are added to pages and templates in the form of 'widgets' (advanced level topic).
Databased Menus (NB: This is an advanced level topic which is not available to all users)
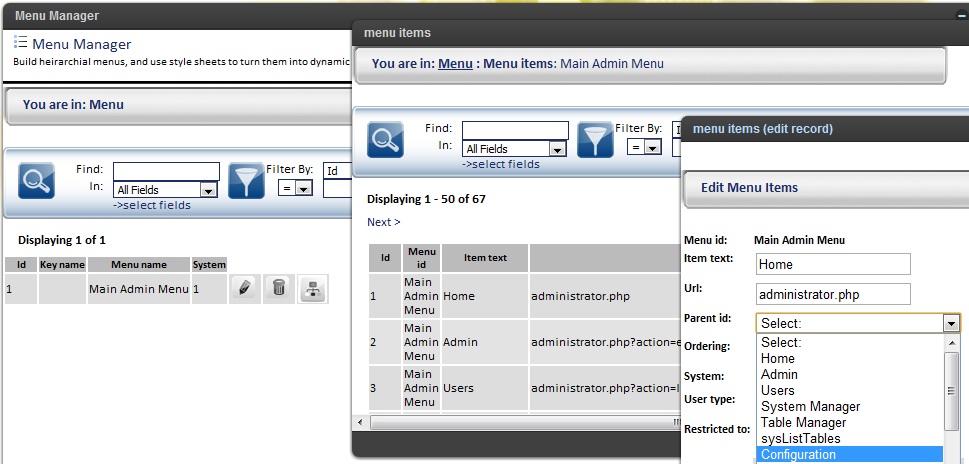
In the database method, menus span not just one editable item but many. The menu is given a name in the menu section, and items within the menu are entered separately in the menu items section - which is accessed by clicking the 'Edit menu items' button by each menu in the main menu section itself. See figure 9.2 to help clarify the following information:
Menus are added in the same way as any other data, only in the Menu Manager section. All you need to do here is give the menu a name and save the menu. You can then select to edit the menu items by each menu. Clicking into this next section on the menu allows you to enter the text and url for each further menu item, together with selecting the parent menu item (if this item has a parent). Thus from these multiple data entries the software can create a full hierarchial menu by referencing the menu name from your original entry under 'Menus' and the various items you have added in 'Menu Items'.
This more advanced method of creating menus exists as further filtering can be performed on the menus. Within each menu item are further fields - User Type and Restricted To can be filled in with different user types, allowing you to create more dynamic structures. Select a user type in 'Restricted to' and that menu item will only be displayed for that user type. In User Type you can type a comma separated list of user types who are able to see the menu item. Thus one menu can be used to provide different options to different user types.
In order to enter this type of menu into a content item, use the simple tag {=menu:5} - where the number is the id of the menu itself. The menu will be printed to the screen and you can use your own CSS code to style it as you wish.
Further Support
For
further help and support, please contact Paragon Digital on 0775 646 0555.